Short Order Vue: A Vue 2.0 App
The beginnings of an app to see what Vue 2.0 and Vuex 2.0 can do.
On Wednesday I shared some of the resources I’ve been using to move from previous releases of Vue to the new Vue 2.0 API. (BTW: I’ve got a few more links to add, thanks to some great folks on Twitter.) The biggest changes in 2.0 aren’t really in the API itself, but there are a few tricky bits here and there.
As I’ve proceeded, I’ve found it is a little easier to just start some mini projects from scratch to test out some of the new functionality, as opposed to trying to reason about how to rewrite old code. In fact, when you work with Vuex, some of the new ways of working either completely eliminate the need for some old code, or reduce the footprint rather dramatically.
Anyway, I put together a little app to make use of some of the new functionality, and to show off a couple patterns that answer a few of common questions I’ve seen around the web (many of which are release agnostic, as they’ve been around since 0.8, or earlier).
If you want the code, it’s on GitHub. It uses the standard Vue Browserify Boilerplate, so all the usual commands apply (npm run dev, etc). I’ve yet to add in-depth comments in the files, but that’s next ;)
The App
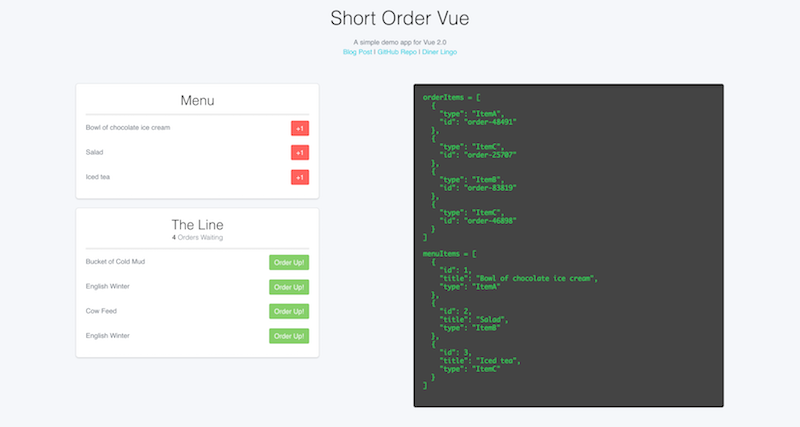
Short Order Vue is just a little demo (sort of like the universal todo app samples out there) that has a little selection of diner food which you can order. As you do, it fills up The Line, until you dismiss the orders. There’s a few little tricks in there too!
Anyway, here’s a quick look at the important bits of the code directory:
|---- dist                 where the built files end up
|---- index.html           where the app gets attached to the DOM
|---- src
|      |---- App.vue       holds the main app template
|      |---- components    houses the app’s custom Vue components
|      |---- main.js       the entrypoint with the Vue object and Vuex store
|      |---- vuex          is where we implement the store
Not much out of the ordinary here, jut a bit of bookkeeping before moving on.
index.html
Let’s get this one out of the way first. Nothing different than the boilerplate here except I’ve added the Bulma CSS framework just to make the demo look passable.
main.js and App.vue
One change in 2.0 is to the template rendering code. You’ll notice when you create a new app with the vue-cli that you get a prompt like this:
> Runtime-only: lighter, but no support for templates defined in .html files (.vue files are fine)
  Standalone: heavier, because it includes the template parser to allow templates in .html files
The choice here depends a bit on your preferred way of working, but if you are going to use .vue files / Vue components for the majority of your app, then Runtime-only is the choice you should make. You can read more about 2.0 templating in the docs as well the 2.0 changes doc and migration guide.
The upshot of this is, you can no longer place the app template in your index.html file and auto-magically slurp it into your main.js. Instead, you’ll see this directive to render the template found in App.vue:
render: (h) => h(App)
App.vue is pretty straightforward as well. There’s some styles at the bottom (those will get pulled out into build.css) and the main app template at the top. Other than providing the HTML structure for the app, the only thing we do here is import the three components you see in the screenshot above.
SovConsole.vue
Inside the components directory are the three main interface elements. The simplest of these three is the console. The only 2.0 thing in here is:
import { mapState } from 'vuex'

computed: {
    ...mapState({
         menuItems: ({ menu }) => menu.items,
         orderItems: ({ orders }) => orders.items
    })
}
mapState is a helper in vuex that is a shortcut to watching some member of your vex store. In this case the console component wants to be up-to-date if and when the menu or orders collections are updated.
There’s a bit of ES5 / ES6 magic going on here, so if you’re unfamiliar with either, you may need to go do a little catching up.
The spread operator ... will add two function definitions to our computed object, one that fetches the items in the menu collection and one for the items in the order collection (see the vuex sections below for more info). ({menu}) simply injects the menu collection of our global store into the function, so we don’t have to write state.menu.items.
That means we can use {{menuItems}} in our template, or any other context where you would use a computed property. In this component, we use it to simply output the string representation of the collections so that we can see what happens when we interact with the app.
SovMenu.vue
The menu component also makes use of mapState to populate the menu you see in the app. It also makes use of mapActions:
import { mapActions, mapState } from 'vuex'

methods: {
    ...mapActions(['newOrder'])
}
mapActions is another vuex helper that, you guessed it, maps actions that are defined on your vuex store, into a components methods object.
Here we are pulling in the newOrder action which is used to dispatch a mutation event in the store itself. We bind this method, like any other, onto the DOM element we want to trigger the event:
<a @click="newOrder" :data-type="item.type">
You’ll notice here that we also have a binding for the item’s type. We attach this to the DOM element’s dataset so that when the action is fired, we can create an order for the specific menu item in question.
(There are other ways to do this, but I want to show a couple different ways of passing data around.)
Let’s take a look at how that type is used.
SovOrders.vue
The orders component displays all of the orders currently in the queue on The Line. In order to demonstrate how dynamic component rendering works, I made three components, one for each of the items on our menu.
import ItemA from './menuitems/ItemA.vue'
import ItemB from './menuitems/ItemB.vue'
import ItemC from './menuitems/ItemC.vue'
Each component does something a little different than the other two; try adding one of each and then dismissing them from The Line.
This is a bit contrived for this simple example, but in a full-blown app you might have a loop that renders different components, each with loads of functionality that is distinct from the others.
For example, imagine a loop that renders cards for music albums, videos and images. In each case you may have many unique actions side the components. The video component might have a playback control, that the image would not, etc.
At any rate, the decision as to which component gets rendered lies in the v-for loop (more on the transition in a minute):
<transition-group tag="ul" name="fade" mode="out-in">
    <component
        v-for="order in orderItems"
        :is="order.type"
        :key="order.id"
        :order="order"></component>
</transition>
If we didn’t have a transition here, you might just have:
<component
    v-for="order in orderItems"
    :is="order.type"
    :order="order"></component>
Now, because we want list items to transition in and out as they are added and removed, we use a transition-group around out component. Transitions have also changed a bit in 2.0, and there’s good documentation on them, specifically list transitions.
The transition-group will render a <ul>, specified by the tag parameter, and the transition name and mode are passed along as well. The only thing we need to make sure is that our component instances all have a unique key, bound to the :key parameter inside the loop.
(The orders module in our store generates not-so-unique order ids for each object. More on that below.)
So, putting it all together, what this does is:
- creates a
<ul> - iterates over the
orderItemscomputed property - decides which template to render based on the type value assigned to
:is, such asItemA; this is the value we passed in from the menu component when we callednewOrder - injects the current
orderobject so we can use it later when we want to dismiss it from the queue
Now, when the order collection changes, new <li>s will fade into the list, and out when they are dismissed / removed from the collection. Woot!
ItemA.vue
I’m only going to look inside one order component because they are all basically the same. I will highlight the differences though.
First off, we expose a prop to receive the order object we injected in our component loop above:
props: ['order']
Without some reference to the order object itself, we would not know which one we were popping off the queue.
Each template looks something like this:
<template>
    <li class="mud">
        Bucket of Cold Mud
        <a class="button is-success" @click="sendOrder">Order Up!</a>
    </li>
</template>
The button here calls the sendOrder method, which in turn triggers the orderUp action defined on our store:
methods: {
    sendOrder () {
        this.orderUp(this.order.id)
    },
    ...mapActions(['orderUp'])
}
In this case we make use of sendOrder to pass along the id of the order we injected, so we know what to remove from the orders collection.
(Again, there’s a few ways to do this, but we’re trying out different techniques here.)
The only difference in the other two items is the definition of their sendOrder functions:
ItemB.vue
sendOrder () {
    if (window.confirm('Did you remember the Love Apples?')) {
        this.orderUp(this.order.id)
    } else {
        return false
    }
}

ItemC.vue
sendOrder (event) {
    event.target.className = event.target.className + ' spin'
    this.orderUp(this.order.id)
}
store.js
Finally, we get to the store itself. The only thing we doe in store.js is import the menu and orders modules, and define our two actions:
actions: {
    newOrder ({commit}, event) {
        commit('NEW_ORDER', event.target.dataset.type)
    },
    orderUp ({commit}, id) {
        commit('CLEAR_ORDER', id)
    }
}
In a big app, you might parcel these out into an actions.js file, or maybe multiple files, but here we don’t have that much clutter yet.
Both these actions simply pass on a payload to a mutation. A little more ES5 going on here where we inject the {commit} method from our store into our actions so we maintain the proper scope when it gets exec’ed.
menu.js
The menu module just has our menu items in it. (I have plans for this for later!)
orders.js
Last but not least, we define our mutations in the orders module.
NEW_ORDER (state, type) {
    var id = 'order-' + parseInt(Math.random() * 100000)
    state.items.push({ 'type': type, 'id': id })
},
CLEAR_ORDER (state, id) {
    for (var i = state.items.length - 1; i >= 0; i--) {
        if (state.items[i].id === id) {
            state.items.splice(i, 1)
        }
    }
}
(Pardon the hastily prepared, aka crap, JS here :)
NEW_ORDERgenerates a “unique” id, then pushes an order onto the queue.CLEAR_ORDERlocates the id of the item out line cooks finished and splices it out of the queue
All done
Well, that’s it!
There’s not a ton of 2.0 specific stuff in here yet, but as I said at the outset, it is sometimes easier to start building anew. My plan is to keep adding to this app, and to write mor about patterns specific to 2.0, and those that are good Vue or reactive patterns in general.
You can clone the repo if you want to muck about, or build a copy to run locally. I’ve also got a zip file of the three files you need if you just want to serve it locally to play about.
Hope to see you around “The Diner” again soon.


Twitter
Google+
Facebook
Reddit
LinkedIn
StumbleUpon
Email